How to create a backend programming question via Mercer | Mettl UI
- Click on Select Question Type and go to Application Based Questions in the drop-down options and then select Code Snippet Question.
- Provide a topic name to which the question is supposed to be added by clicking on the Select Topic button. In case the topic is not one that already exists, you can create a new one.
- After selecting the question type and specifying the topic, you will be
redirected to the question creation screen. The process here onwards can be
divided into three steps:
- Question Description
- Question Settings
- Test Cases
(a) Difficulty Level: Assign a difficulty level to your question. You can set it to Easy, Medium, or Difficult by clicking on the drop-down.(b) Question Details: The description of the question will come here, which should include the problem statement, the input and output specifications and for better clarity you can also include an easy example.For instance, “Write a program to check whether the String ‘S’ is Palindrome or not.Input Type: StringOutput Type: Boolean.”Note: You can make use of the editor menu on top to add specific formatting in the problem statement such as images, code snippets, etc.
(c) Question Tags (Optional): This field stores the meta-data about the question.
(d) Code Languages: Specify the programming language(s) for which you wish to add the support for in this question. Mercer|Mettl supports 30+ programming languages.(e) Function Name: Specify the name of the function (using the same convention as we do in programming languages) for which the candidate is expected to write the code. This function name appears in the system-generated template visible in the coding window where candidates write their code.(f) Input Types: Specify the expected input data types here. For example, int, float, string, int[ ] etc. You can add multiple inputs and specify their types.(g) Output Types: Specify the expected output data types here. You can add multiple outputs and specify their types.
Question Settings
- Show Default Results to Candidates (Optional): Select this option in case you want to show the candidates whether their code passes the default test case defined.
We suggest selecting this option to help candidates with easier debugging.
- Custom Check Enable (Optional): Select this option only if you wish to define your custom grading logic for scoring this question and bypass the conventional testcases based scoring where marks are awarded for that test case if the candidate's code output matches the expected output.
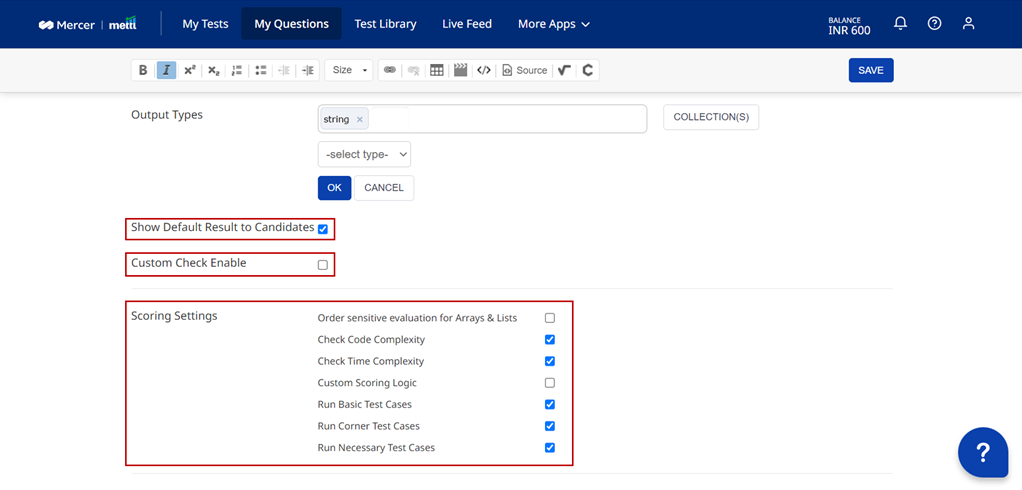
- Scoring
Settings (Optional) : There are multiple scoring settings that you can enable/disable by
clicking on the checkboxes, which are:
- Scoring Settings (Optional) : There are multiple scoring settings that you can enable/disable by clicking on the checkboxes, which are:
1. Order Sensitive Evaluation for Arrays & Lists - Select this option if you want order-specific evaluation when your output return type(s) is/are Arrays or Lists.
2. Check Code Complexity - Enabling this option will calculate the code complexity of the candidate’s code.The code complexity in our backend programming simulator is however, calculated as 100- Cyclomatic Complexity . It is a quantitative measure and is therefore displayed in the candidate’s report.This field is optional, but we recommend enabling this field.3. Check Time Complexity - Enabling this option will calculate the time complexity of the candidate’s code.This field is optional, but we recommend enabling this field.4. Custom Scoring Logic: – Enable this option only if you want to bypass the conventional testcases based grading and allot the candidates a percentage of marks based on the following criteria:Note: The grand total of all the scores should be equal to 100a. No Of Lines – The percentage of marks that the candidate is allotted, provided his code does not exceed the maximum lines specified in the field Specify Maximum Linesb. No Of Logical Statements – The percentage of marks that the candidate is allotted, provided the number of logical statements in the code does not exceed the maximum statements specified in the field Specify Maximum Statementsc. Code Compilation - The percentage of marks that the candidate is allotted if the candidate's code compiles successfully.d. Basic Test Cases - The percentage of marks that the candidate is allotted if the candidate's code passes all the Basic Test Cases.e. Necessary Test Cases - The percentage of marks that the candidate is allotted if the candidate's code passes all the Necessary Test Cases.f. Corner Test Cases - The percentage of marks that the candidate is allotted if the candidate's code passes all the Corner Test Cases.g. Code Complexity – The percentage of marks that a candidate is allotted w.r.t his/her code’s complexity, i.e., for example, the cyclomatic code complexity of a candidate’s code is 6; so, the Code complexity will be (100-6=94). If the marks allotted for this criterion is 100 and the overall mark of the question in the assessment is 1, then the calculated score would be(94*(100/100) *1)/100 = 0.94. Therefore, the marks scored by the test taker are 0.94 out of 1.An example of the custom scoring logic has been given below for your reference:Example:
5. Run Basic Test Cases: Select this option if you wish to run all the Basic Testcases against the candidate’s code. This field is optional, but we recommend enabling this field.6. Run Corner Test Cases: Select this option if you wish to run all the Corner Testcases against the candidate’s code. This field is optional, but we recommend enabling this field.7. Run Necessary Test Cases: Select this option if you wish to run all the Necessary Testcases against the candidate’s code. This field is optional, but we recommend enabling this field.Test Cases
Click on the ADD TEST CASE button to add the test cases on which the candidate’s code will be evaluated. The various test case fields that need to be filled are:
1. Testcase Title : Enter the title of the testcase. It can be the same as the type of testcase.2. Testcase Description (Optional) : Enter the Testcase Description here. It can contain information about what the user wants to check with this testcase. This is an optional field and can be left empty.3. Testcase Type : Define the type of testcase; you can choose values from the dropdown.The different types of testcases of our platform are:
A. Default – These are non-weighted
testcases, which are often cited as examples in the problem statement and
the input and output values are visible to the candidates which further helps
them in debugging their code.
B. Basic – These are weighted
testcases against which the test taker's code is expected to pass. These
are the simplest form of weighted test cases and hence contain input and output
values that are basic and for which a logically correct code should work.
C. Necessary – These are weighted
test cases that comprise of input and output values that are necessary with
respect to the problem statement.
Passing these test cases confirms the correctness of a code in an ideal
scenario.
D. Corner - These are weighted
test cases that have corner values as input and output which may not be in
an ideal case. These check the candidate's capabilities of thinking about all
the possible scenarios that can occur while solving a problem statement.
E. Time
Complexity - These are weighted testcases that
are executed multiple times using the same input and output values to imitate a
very large input and/or output. These testcases check whether the code written
by a candidate can process very large values in a constrained time or not.
Time
Complexity Testcases are of 3 types:
· Small – A candidate’s code is executed 10 times within the given time window.
· Medium - A candidate’s code is executed 100 times within the given time window.
· Large - A candidate’s code is executed 1000
times within the given time window.
4. Testcase Marks: Assign marks to the weighted testcase. You cannot assign marks to the Default Testcase since it is a non-weighted testcase.5. Testcase Input Values: Enter the input values of the testcase. They should be synonymous with the type of Input which you have set while selecting the Input Types.6. Testcase Expected Values: Enter the expected output values corresponding to the input values specified. They should be synonymous with the type of output which you have set while selecting the Output Types.