Attempting a Proctored Assessment
Mercer | Mettl is an online assessment examination platform where participant can take a assessment in a secure environment from any location. All you would need is a live internet connection and a laptop/desktop to get you started.
A proctored assessment is usually run on a web-cam integrated computer and participant can be monitored by an external proctor using your live-video feed. Please ensure you have an uninterrupted network bandwidth of 512 kbps during the assessment.
Accessing the Assessment
You can access/launch Mettl assessment using either of the following methods(depending upon the method adopted by your assessment administrator)
- Using the assessment invitation email
- Using assessment link/URL
- Using assessment invitation key
1. Using assessment invitation email
If your assessment administrator has opted to invite you for the via and invitation email, you would receive an email on your email address from admin.mettl@mercer.com (If not found, please check the SPAM folder of your email). The assessment invitation email would look like the following:
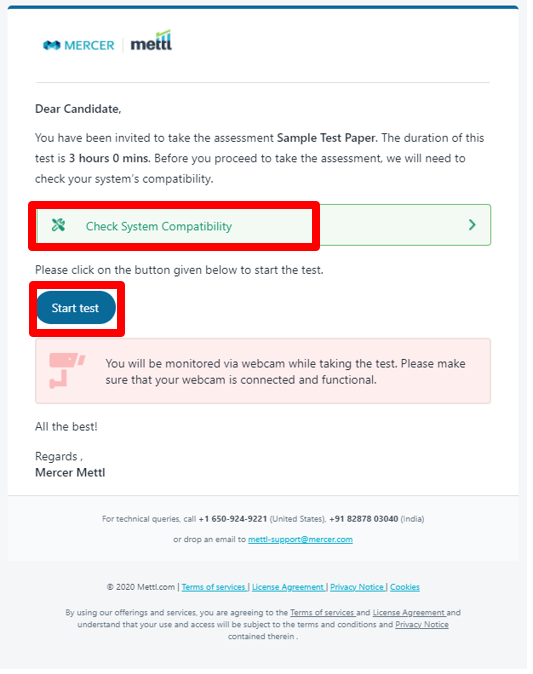
• Click on ‘Check System Compatibility’ tab in the email as shown, it will automatically redirect you to the system check link.
• Click on ‘Start Test’ after the successful system check to start your assessment
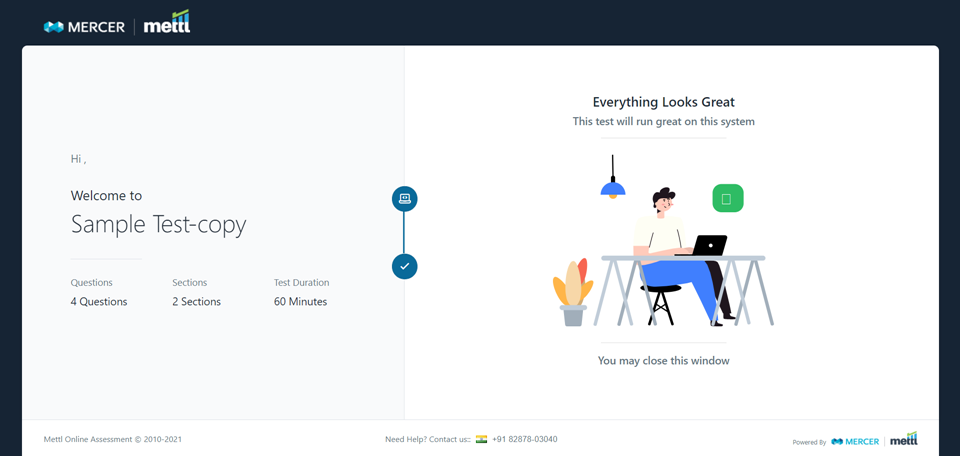
2. Using assessment link URL
If your assessment administrator has shared a assessment link/URL with you, you simply need to paste this URL in the address bar of your browser and hit enter. This will redirect you to the assessment page.

3. Using assessment invitation key
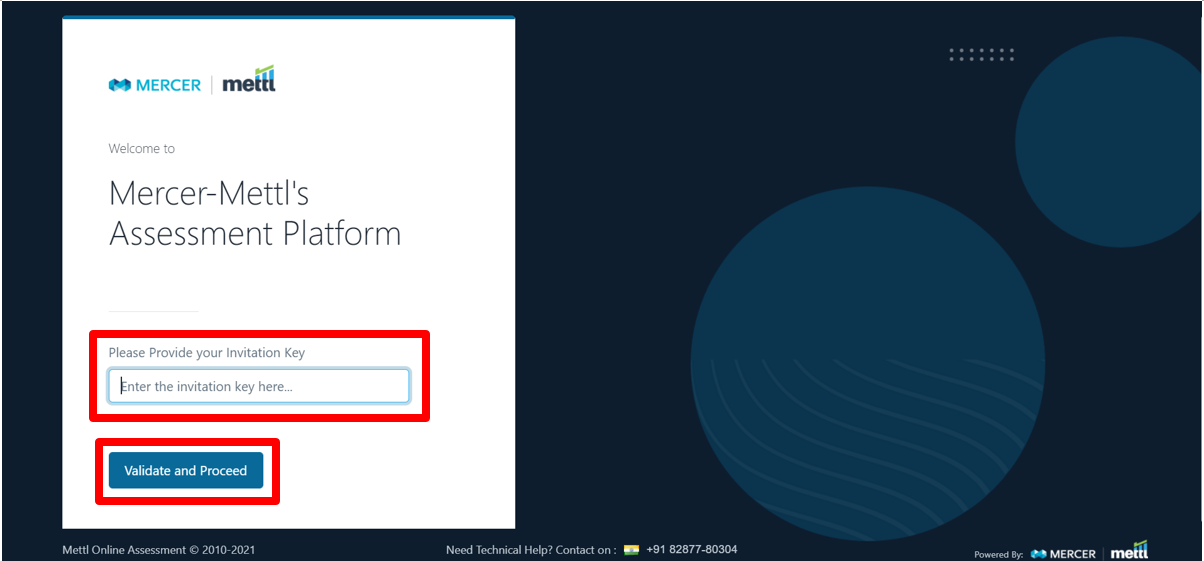
If your assessment administrator has shared a 8-12 digit assessment invitation key with you (something similar looking with eatys352tr), you need to perform the following steps:
- Open your browser and in the address bar, type “tests.mettl.com”
- Copy/Paste or type you invitation key in the box displayed
- Click on the “Validate and Proceed” button
Launching the assessment
Once reached on the assessment page via any of the 3 steps mentioned above, follow the given steps:
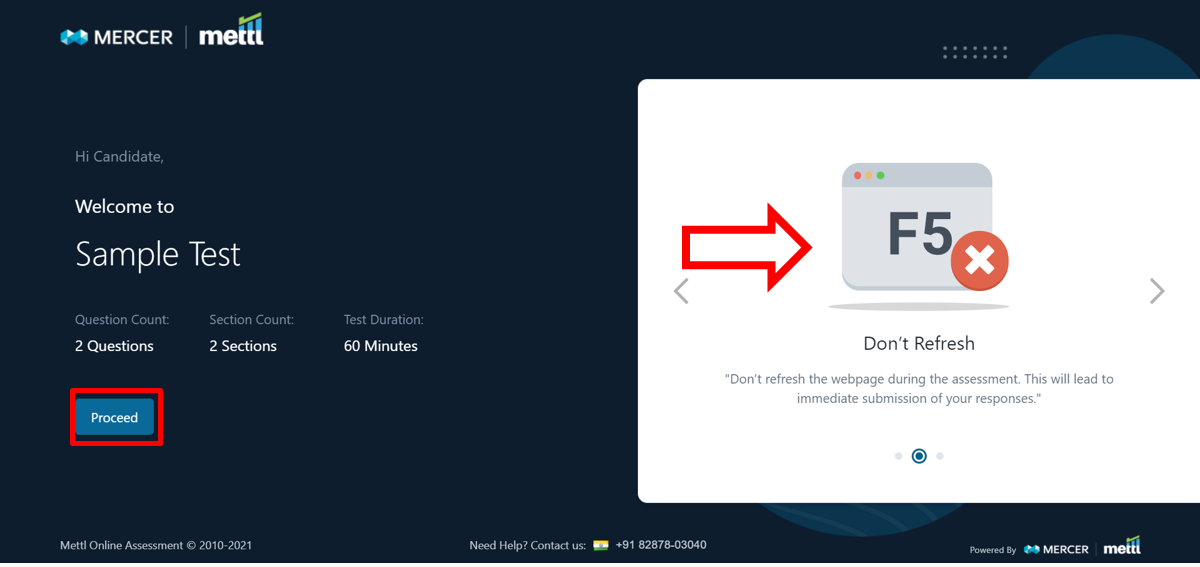
1. Verify and cross check the assessment details displayed on your screen. After carefully reading the instructions mentioned in the floating tiles, click on ‘ Proceed ’ button.
- Internet Connectivity: Ensure that you have a stable internet connection with a minimum speed of 512 kbps.
- Don’t Refresh: Don’t refresh the webpage during the assessment. This will lead to immediate submission of your responses.
- Auto Save: All your responses are saved automatically. In case of disconnection or shutdown, you will still be able to resume easily.
- Contact the highlighted number in case of any issue.
2. A system check is run automatically in the background to check the system compatibility for the assessment.
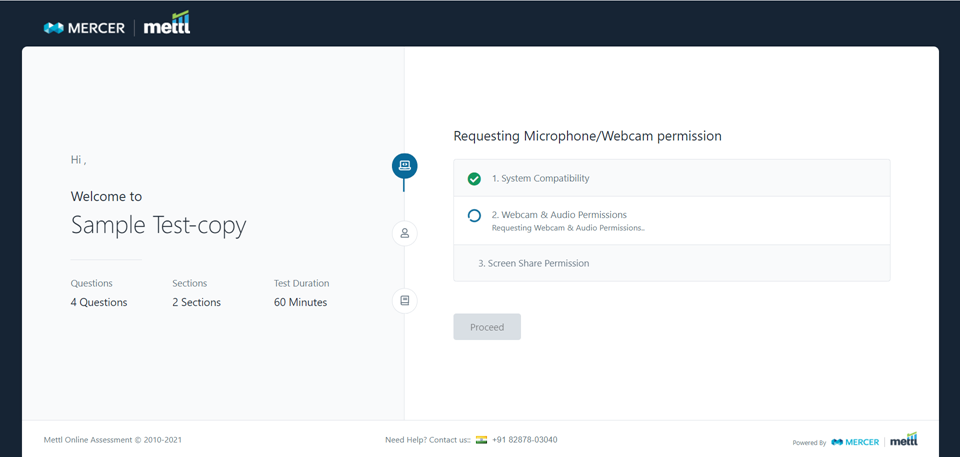
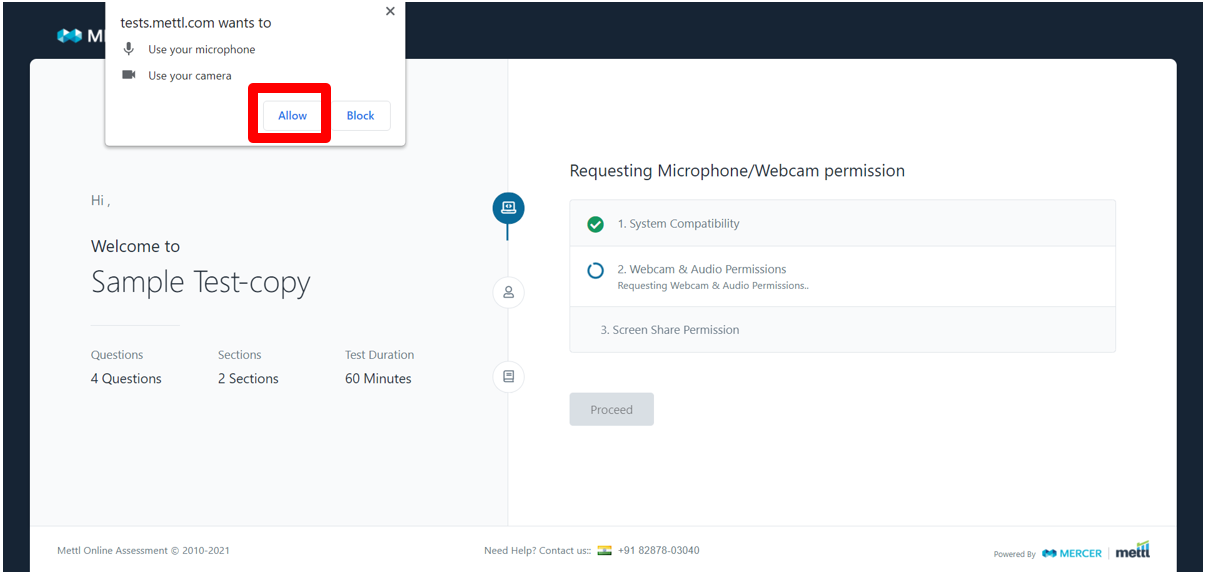
3. After successful system compatibility check, click ‘Allow’ button on the pop-up displayed on the top left corner of your screen to enable the webcam and microphone permissions on your system.
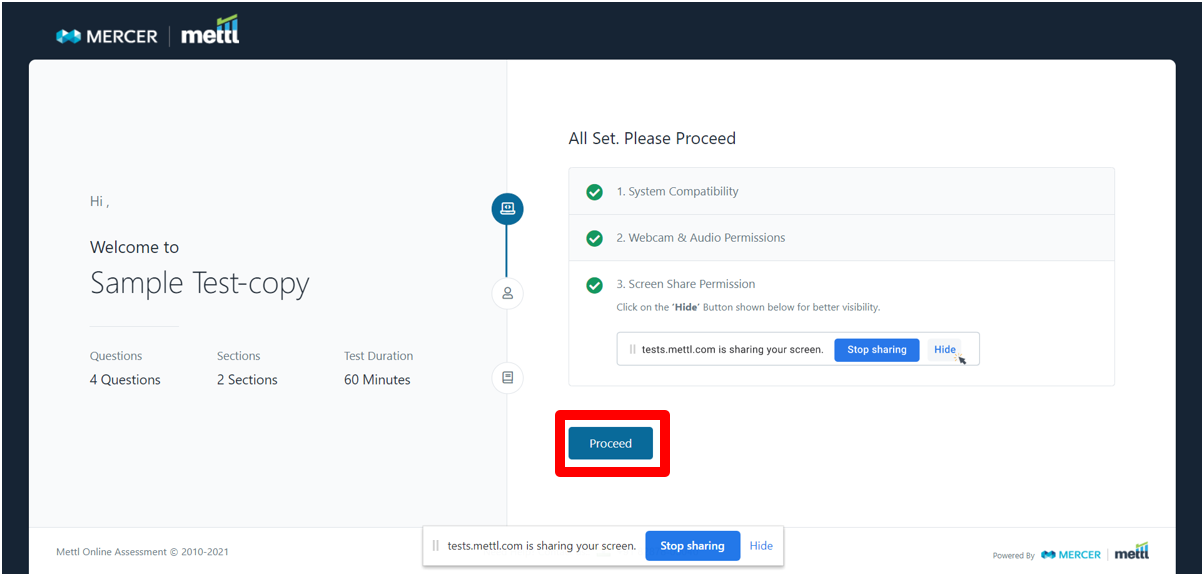
4. Enable the Screen Share Permission by following the step sequence:
- Click ‘Start Screen Capture’ button as shown below.
- A pop-up will appear, select your entire screen by selecting the window as displayed, click ‘Share’ button.
- After screen sharing is enabled, click ‘Proceed’ button.
 Please Note:
- Turn off all the notifications on your computer during the assessment.
- Do not switch between the assessment window and other applications/tabs on your system, this may lead to a warning or disqualification from the assessment.
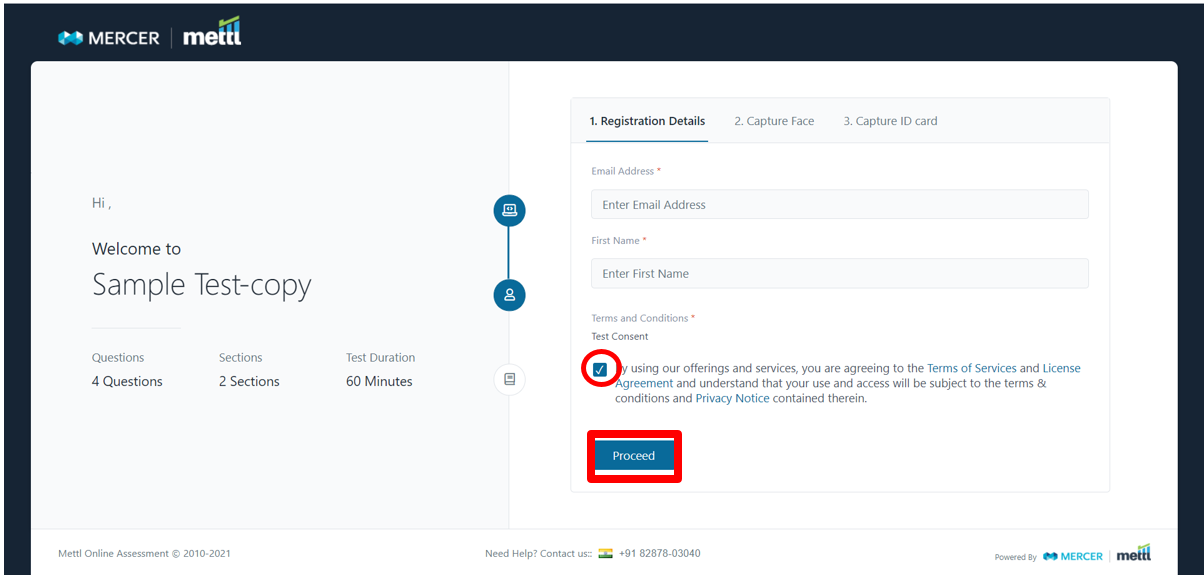
5. Enter your registration details in the box provided (* defines the mandatory field). Read and accept the terms of service by clicking on the ‘ check box ’ as shown. Verify and click ‘ Proceed ’ button to complete your registration details.
6. Submit your live image via webcam, follow the instructions displayed on the left side of your screen. Ensure the clarity and visibility of the picture.
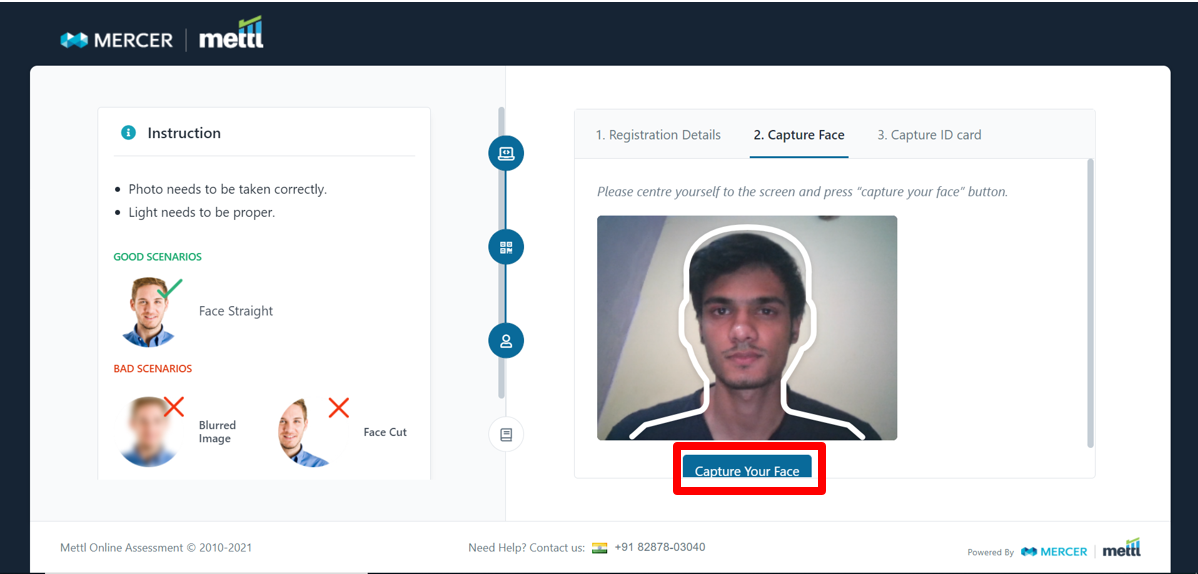
- Click on ‘Proceed’ button after verifying your image. You can resubmit the picture by clicking ‘Re-Capture Your Face’ button.
7. Submit your valid Identity proof via webcam, follow the instructions displayed on the left side of your screen. Ensure the clarity and visibility of picture.
- Click ‘Capture Your ID’ button
- Click ‘Submit’ button after verifying the captured image. You can resubmit the picture by clicking ‘Re-Capture Your ID’ button.
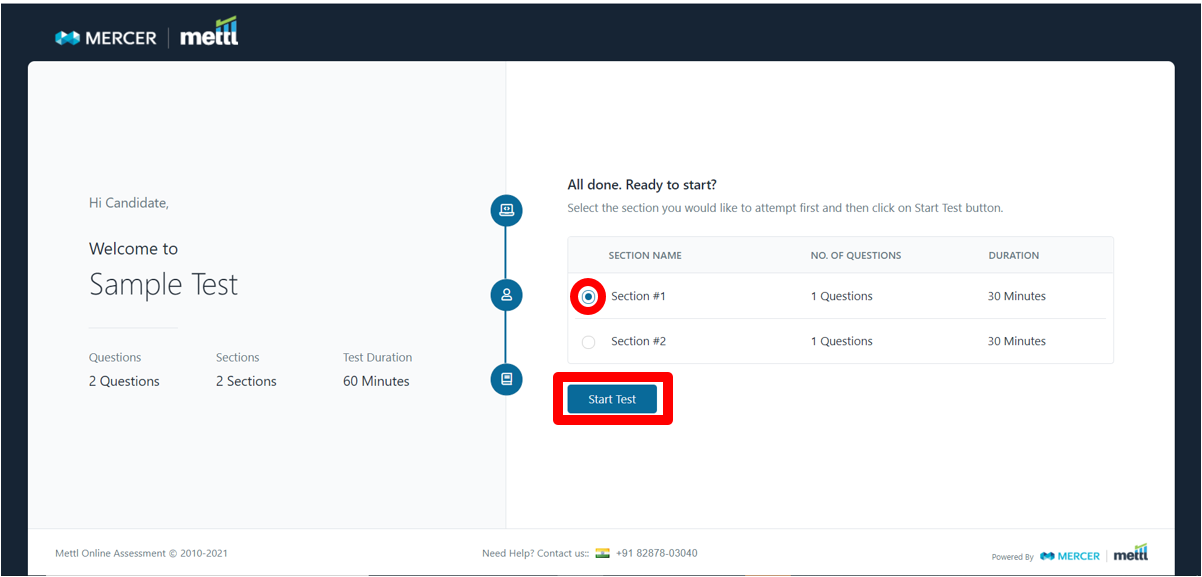
8. You can choose the section you wish to attempt first by ‘selecting the radio button’ as shown, click ‘Start Test’ button after selecting your choice of section. The assessment screen would automatically go in full-screen mode, do not exit or refresh your window.
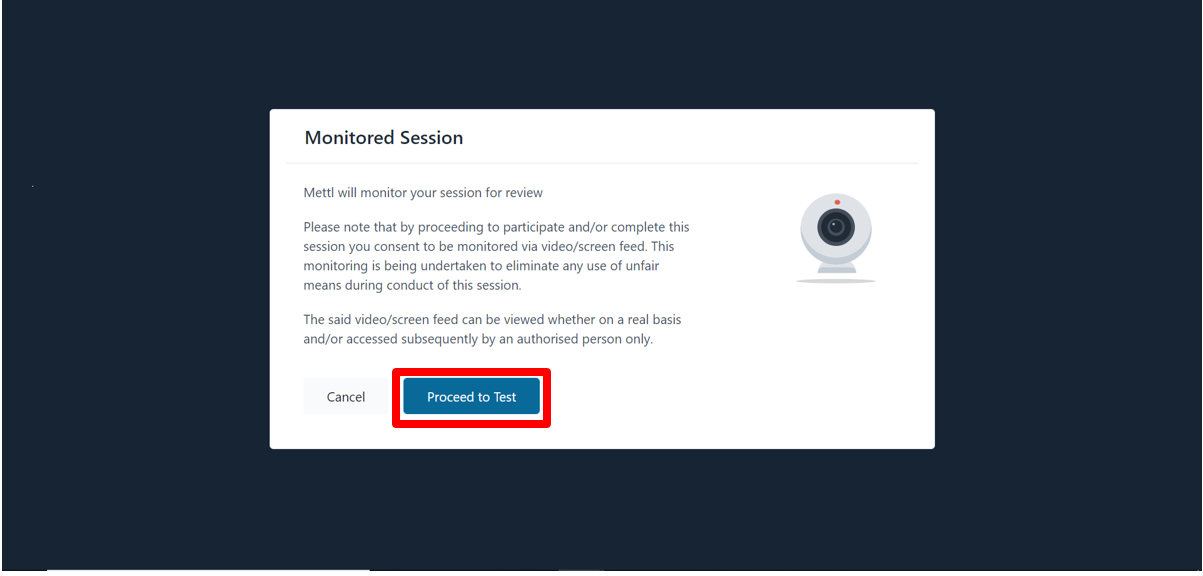
9. Click ‘Proceed to Test’ button after carefully reading the consent message of monitored session as shown below. Do not exit or switch onto any other window applications, your assessment is ready to begin.
Attempting the assessment
Once reached on your assessment window, on assessment screen you may see:
-
Assessment Time – Displays the overall remaining assessment time left, displayed on top right corner of assessment window.
- Section Time – Displays the section specific time remaining.
- Adjust Font – You can adjust the size of your font by clicking the setting button present on the top right corner of assessment window.
- Change Theme – You can change the theme of your assessment by clicking the setting button present on the top right corner of your assessment window.
- Next Question tab – You can switch between the questions by clicking:
- Previous’/‘Next’ button.
- Using arrow keys displayed on your assessment screen.
- Using the question palette displayed at the top center of the assessment screen.
- Overall Question Status – It is color coded and displays the status of question. It can be accessed by clicking the ‘pie chart’ button as shown in the sample picture. The color code is as follow:
- All Questions – Black color
- Revisited Questions – Orange color
- Attempted Questions – Blue color
- Unattempted Questions – Grey color
- Revisit option to help you mark a question that can be reviewed later before finishing the assessment. The questions marked as revisit appears in orange color in the question palette as shown.
- Clear Response to clear the response attempted for the question.
- Floating Calculator depending on the assessment type, can be accessed on the center console of the screen as shown.
- Section switch drop-down on the top left corner, in case you have multiple sections in your assessment.
- Lock button – The section is locked and responses cannot be modified.
- Percentage Completion – Displays the percentage of section completed.
- Instruction button on top left corner, displays both Section Instructions and Assessment Instructions.
- Finish Test button to submit the assessment, you can even view the assessment status and summary - section wise attempt/unattempt/marked for revisit questions as shown in the sample picture.
- Click on ‘No, Back to Test’ button or the cross button present on top right corner in case you wish to still modify the responses or attempt questions.
- In case you wish to end the assessment click ‘Yes, End Test’ button. Note: You cannot modify/attempt questions once you click this button.
- After the assessment ends, you will redirect to the feedback page. Select the stars to choose your rating of the assessment experience and type in your feedback in the box present (mandatory) as shown in the picture.
- Click on ‘Share your Feedback’ button to submit your feedback. You can exit the window now.